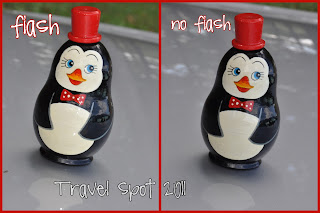
Showing posts with label 12 Weeks to Better Photos. Show all posts

11.03.2011

9:12 Portraits

Well, we have somehow already made it to week 9, which I admit I was kind of dreading, as portrait photography is not really my forte. But, here we are, so I took a stab at it. You can join in, even with a Point and Shoot! This week's lesson is HERE

This week's assignment was to choose one or all of the following options for taking your photos:

1. Take a portrait of an individual.
2. Take a group portrait if you have the opportunity.
3. Take a portrait in front of a backdrop or colorful wall or a fun outdoor setting.
4. Take a portrait with black & white film or convert your photo to b&w. (In fact, we'd love to see both versions - color and black & white, if you care to share.)

There are a few tips you should follow when taking photos of people. First, no matter what f/stop you are using, make sure to focus on the subject’s eyes. You don’t want to turn out having their shirt or hair or even worse, the background, in focus while the subject is just a tad blurry. I have accidentally done that before, since you can’t quite tell in the camera that it is not quite all the way focused. Don’t do this! You will be sorry later.

Portraits often look better if you lower the f/stop, which literally puts the focus on the subject and blurs the background so that the subject really pops. You can even do this with a point and shoot. Use the icon called Portrait (a little head). If you are taking photos of tall people, try to get them to sit, or you should stand above them (because a picture of the bottom of your chin is never flattering!) If you are taking photos of children, try to get on their level.


Taking a photo of a group is of course hard. The more people you have, the more likely one of them will not be looking at the camera, not smiling or goodness only knows what else. It’s good to take as many shots as you can. Never take only one group shot. And try to loosen things up a little with a fun shot. My family did a bunch of normal, smile for the camera group shots last Thanksgiving. Then we said to, “act as silly as you can”. This was the result. 


They also suggest using a fun background. In this case, I used a plain background so that the subject would really stand out. That’s me by the way. Mr. L made me put on his hockey equipment and block some shots. Have you ever smelled a pair of hockey gloves? Nasty. 


What did I learn? I still need a lot of practice with this, and some willing subjects (Mr. L is tired of my putting my camera in his face). I am much more comfortable with inanimate objects.
Join in next week for Week 10, Landscapes (also can be done with a P&S -- the little "mountain" button). 

Do you like taking portraits? What is your favorite silly group shot that you have seen? Do you prefer color or black and white? 
10.27.2011

8:12 On The Go

This week's assignment was about taking photos of things that are in motion (<--- pdf for lesson here), which can be very difficult. I am sure we have all gotten photos like this of babies, dogs, athletes or even your family eating Thanksgiving dinner:


Note that my friend who is holding the baby is not blurry. The baby, on the other hand, is moving just enough to be a little blurred, which ruined an otherwise good photo.

So how do we get it so the subject is not blurry and the action is frozen? There are a few things you can do. You can adjust your shutter speed so that it is faster (If you have a point and shoot, use the "sport" setting, which is the icon of the running man). This, as we learned in lesson two (the one with the water on the glass) can decrease our lighting. So, we may need to bump up the ISO or lower the f/stop. Remember the Exposure Triangle?


Our Assignment this week was to do one or more of the following:

1. Use a fast shutter speed outdoors to photograph your moving subject
2. Experiment with panning
3. Embrace a little blur indoors
3. Take action - practice your skills at a sporting event
4. Take a portrait of your pet-in-motion

Here are a couple examples. I chose number 1 and kind of, but not really number 4. I just noticed there are two number 3s, which doesn't matter since I did not really practice either of them.


The first photo of Lucy was taken with a shutter speed of 1/250, an aperture of f/5.3 and an ISO of about 3200.

The second photo was taken with a shutter speed of 1/800. The suggested setting is at least 1/640 outdoors and at least 1/250 indoors. As you can see, it freezes the action enough to catch me in midair and catch that little bit of sand being kicked up. Isn't that fun? The ISO in this photo is 640 and the aperture is f/8.0. The only thing that needs work now is that the photo is exposed on the background instead of the subject, which makes the subject's face dark. That is one thing the lesson suggests, is using Manual Mode, so you can expose the light to the subject's face rather than the background. 

What have I learned? I have an easier time "stopping the action" when I am outside, since there is more light and it is easier to up the shutter speed without compromising your light. When indoors, it is hard to get a good balance. I am definitely getting more comfortable with upping my ISO, which I was not really using when I started taking photos with my new camera. I thought I had to slow DOWN the shutter to get enough light, when instead I should speed it up and raise the ISO.

Join us next week when we talk about Portraits. Don't forget to link up with Kate


Have you ever tried taking action photos?

10.20.2011

7:12 Shooting Outdoors and Macro

Ah...Week 7...shooting outdoors, (<----pdf here) where once again you need to have a "subject". So...I have to admit, I went fishing through the archives and used my little niece as my guinea pig this week. This week we learned about shooting outdoors and what things you may compete with out in the big wide open.

First, you need to try not to have your subject in harsh sunlight. At first you may think that it's great to be outside becuase there is plenty of LIGHT! But, alas, another problem with photography is that you can have too much! So, you may get subjects that look like THIS. Too much sun makes squinty eyes and harsh light/shadow combinations. 

(Actually she looks pretty good. I look like a classic "DON'T")

It is better to put your subject under a tree, an umbrella or a porch to get a result more like this.


The other thing this lesson talks about is using an overcast sky to your advantage. Now you CAN stand outside without an umbrella and you don't have harsh light. The clouds act as a natural filter.


I am not exactly sure why the authors of this lesson did this combo, but this lesson also covers Macro, or close up, small photography (maybe they didn't want 13 weeks of better photos?) You can use the "flower" setting on your point and shoot to get really close to your subject and get the fine details. I actually used my point and shoot for these. With a DSLR, you can use the flower setting, but it works better to have a macro lens, which I have not yet splurged for. They do have an adapter you can use that is a little cheaper. Or you can turn your lens backwards with THIS and you get a fun effect!


Don't forget to link up with Kate! And join us for week 8: On The Go!

Have you ever taken one of those bad squinty sun photos? What's your favorite thing to photograph close up?

10.13.2011

6:12 Shooting Indoors

This week for 12 Weeks to Better Photos, we had to focus on shooting indoors, while trying to utilize as much natural light as possible. The problem I had with this one is that it calls for a "subject" and since I don't really have any guinea pigs, I had to use myself. I really don't like putting photos of myself up, but here's to learning how to shoot better photos indoors while also learning how to take self portraits. I don't have a tripod or a remote; I used the remote control for the TV and the window ledge (or chair seat, or bed).

This one is a good one to try, no matter what kind of camera you have. You can join in with Kate HERE. The pdf for this week's assignment is HERE.

The idea this week was to learn how to take better photos inside without using your flash. In this case, you may need to adjust your Aperture, Shutter Speed, ISO or Exposure in order to make sure that there is enough light for your subject. Another trick is to get them to stand near a window (make sure the window is not behind them or they will be dark!) while you stand at or near the window to get the maximum amount of light possible. If you have a point and shoot camera, you can still adjust the ISO and exposure pretty easily, and the shutter speed and aperture can be adjusted using the "portrait" mode (and some P&S cameras have more in depth adjustments).

This week's assignment was this: Choose one or all of the following options for taking your photos:

1. Position your subject in direct light and then reposition your subject in indirect, or filtered, light.
2. Capture catchlights - have your subject face the window while you're sitting or standing with your back to the window. **(catchlights are the little light "windows" in the person's eyes)**
3. Position your subject so that he/she/it is parallel to the window, while you are perpendicular to the window.
4. For those with SLRs or digiSLRs: If you can adjust the exposure meter on your camera, try metering on the background light vs. metering on your subject and setting the exposure for your subject. Also note that you could use a wall in the room or the floor to set your exposure meter.

I did not really have any opportunities for direct light, as my window is north facing. So, I tried experimenting with numbers 2 and 3 mostly. Seriously, I am a bit embarrassed when posting photos of myself (especially so close up!) It's like I am saying, "look at me!" Don't look at me; just look from an artistic standpoint. Or an educational one. Pay no attention to the man behind the curtain!

In the first photo, this is an example of having the subject (um, me) stand parallel to the light source, in this case the window, while the photographer (my arm) stands perpendicular to the window. Don't mind the messy hair or the dazed look. Look at the LIGHT!


In this second example, the photographer (the windowsill) has captured the catchlights in the eyes of the subject. This really livens up the subject's face and draws attention to the eyes, where it should be.


Okay, whew. That's enough self portraits for now! Join in next week, when we work on Shooting Photos Outdoors. Hopefully Papa P can be the subject for that one!

Also, Kate also clued me in on this fun 30 day photo challenge from Click it Up a Notch. I may attempt to do some of these in tangent with the 12 Weeks to Better Photos course, just for fun. It's always good to get more practice and to get ideas for what to shoot next! So I guess this week, I am satisfying day 1 or 30 (self portrait) for sure, as well as Day 11 (blue), Day 14 (eyes) and Day 29 (black and white) !!! Sweet.


Do you have problems taking photos indoors? Are you self conscious of self portraits? Do you like photos of yourself?

*******

Don't forget...speaking of photos, you can win a cool scrapbooking and photo manipulation software where you can put all these photo tips to good use! Ends October 16th! Go HERE to enter!

10.06.2011

5:12 Compostion

For those of you who voted last week on which photo I should make into a canvas print, thank you! Here are the two winners.


And now, for week 5 of 12 Weeks to Better Photos, our task was to concentrate on Composition, with these six tips in mind:

1. Keep it simple - eliminate distractions
2. Apply the rule of thirds
3. Keep an eye on the horizon
4. Frame your subject
5. Fill the frame
6. Try a new perspective

I took a few photos this weekend, and I had friends take a few photos of me, to give examples of these.

This first one is a great example of rule number 1 (eliminate distractions), 2 (rule of thirds) and 4 (frame your subject). In photo number one, there are people behind me and I am right smack in the center of the photo. Take a look at photo number two. What are you looking at now? Not the people behind me. You are looking at the subject. Also, I am not right in the middle anymore. I am off to the side so you can see both the subject and the other important elements of the photo. 


This next one is a great example of rule number 2 (rule of thirds) and 3 (eye on the horizon). In photo one, the photo is split in half. You are not sure where to direct your eye. Should you look at the road or the sky?  In photo two, it is better proportioned, with the sky taking up roughly one third of the photo instead.


This is a classic example of what NOT to do. In photo number one (bottom right), the pole is obstructing the subject of the photo. Also, again, the subject is right in the middle. This can confuse the eye and the brain when trying to figure out what to focus on / what is important. The other two photos not only clear up the space a lot, but put the subject closer and in more of a pleasing position in the photo. Notice the rule of thirds, not only for the horizon, but for the subject as well.


The next one makes me laugh. Every time I ask someone to take a photo for me, they put me (the subject) right in front of what I am trying to get them to take the photo of me WITH. For example, I've been positioned right in front of the Eifel tower, and had many strange things (poles, signs, church spires) coming out of my head instead of being beside me.

Sometimes the easiest thing to do when composing a photo is to have either the subject or the photographer take ONE STEP to the left or the right. For example, in the photos below. My friend took photo number one first, in which I am not only obstructing the path, but I am right in the middle of the photo again. So he took a step to the left and BAM, now you can see me AND the path and I am off to the side, which satisfies (accidentally in this case) the rule of thirds (now we just need to work on the dappling sun/shade combo.)


Oh...what is the rule of thirds, you ask? You can read more about it here, but basically, you section your photo off into 9 equal sections, like in the photo below. You want your subject to be basically along these lines or their intersections. See that the horizon as well as the girl are placed along these lines? Your camera, even if you have a point and shoot, should have a "display" mode where you can see these lines as you are taking the photo. It makes the photo more pleasing to the eye. Try it and see!


This week, I have an assignment for you. No matter what kind of camera you have, try using the rule of thirds to place your subject in a more pleasing position in the photo. Even if you only have sky and land, try placing your sky either 2/3 up or 1/3 up from the bottom of the photo! Come back and let me know how you did!

Have you ever asked someone to take your photo and ended up blocking the thing you wanted the photo to be with? Have you ever experimented with the rule of thirds or composition in general?

You can link up with Kate this week and/or join us next week, when we learn about Shooting Indoors.

9.29.2011

Life On Canvas

Hi everyone. I am going to post today's 12 Weeks to Better Photos soon. But first, I have a little request for you guys. I recently got a Groupon for 2 (two) 16 inch by 20 inch canvas prints. I have to pick them by mid October. Do you know how hard it is to narrow your photos down to TWO!? It's such a big decision! I mean, there are so many I like, but now it's Pressure Time. Do I want landscapes or people? Travel Photos or photos of home? Black and White or Color? AAAAHHH!! And they are going to be kind of big, so I want to take that into consideration.

Can you help me? I have narrowed it down to seven. It was hard. I decided that I didn't want huge people staring at me (especially myself). It's down to travel, home and landscapes, or a combo of two. Now it's go time.

HERE IS WHERE I NEED YOUR HELP! I have to pick TWO of these to make into prints. I don't really care if they go together per se, because I can always hang them on different walls, or in different rooms. Here they are. I have numbered them so if you could let me know which number you like the best, that would be so helpful. I am driving myself crazy over here (believe me, picking these 7 was not easy and I am still doubting/second guessing my choices).

1
2
3
4
5
6
7
Thanks so much for your input! 
___________________________________________________________________

And now, the 12 Weeks to Better Photos: Week 4: Flash

Okay, so for this week's assignment, we had to play with our flash. I rarely use my flash. I feel like most of the time it washes the subject out. But, that may just mean I need more practice.

The assignment was to go outside and take photo of someone with the sun at their back without the flash and then with the flash. The second part was to go outside on a cloudy day and to use the flash to brighten up the subject.

There were no sunny days so I decided to stimulate the sun by doing my photo inside. As you can see, if the light is behind the subject, it is better and brighter to use your flash.


For the second part, we luckily (?) had a lot of cloudy days, so it was no problem. Again, the flash brightens it up just a tad, which can be helpful at times. 


I was not really super excited about this assignment to be truthful. Not only do I not like my flash (the one that comes on the camera) but I also don't take a lot of photos of people, or subjects that necessarily need lighting. However, I do feel like I learned that flash is not always bad! Maybe I would like to use it more if I had this. 


Anyway, make sure to link up over at Kate's and join us for week 5: a lesson on Composition.

Do you use your flash a lot? Do you like it? Please, don't forget to let me know which of the above photos I should put on a 16 x 20 canvas!!!!

9.22.2011

3:12 White Balance

Welcome to Week Three of 12 Weeks To Better Photos! This week our task was to learn about White Balance. Even with a point and shoot, this is a fun experiment to try! The button should look like this one on the left, the little plus and minus in a box. Don't forget to go to Kate's page where you can link up after you've tried this experiment! HERE is the pdf for week three. It's also not too late to try weeks one and two as well! The links will be up until the end of the 12 week course!

source
Here are the common WB settings (missing from this list is Auto and Custom, which is different for each camera). In case you were wondering, Florescent is office or warehouse type lighting. Tungsten is the normal yellow bulbs you use at home. I think the others are self explanatory. 

Our task this week was to try all the different settings to see what the differences were. We were also tasked to learn how to set and use our custom setting (which is not on the above menu) which you have to do using a white piece of paper (so your camera knows what "white" should look like in the current light).

The question to answer was: What can I do to combat color cast in indoor photos? 

The subject once again was, you guessed it, Papa P. But today for you penguin lovers out there, we have a surprise guest... MAMA P (I know you were wondering about Papa, but don't let the top hat and bow tie fool you)!! Here they are, in all their penguin glory, in 5 settings: Custom, Auto, Tungsten, Florescent and Sunny.


Notice they are each a little different in coloring. Some are more yellowish, some more bluish. Actually, since Papa and Mama are dark and the chair behind them is dark, this is not a great example. I just wanted to introduce you to Mama. Here is a better example. My white shirt has a better contrast.


So now you see. Sunny is a little too yellow; tungsten is more blue and florescent is more pink. Custom is supposed to balance out the white, but I may have set it wrong, becuase I still prefer Auto. I definitely need more practice. This is a good experiment though becuase even though I did not show my face, it too would be...yellowish, bluish or pinkish. And nobody wants that. It is important to have the right White Balance, or you may look jaundiced, sad or drunk.

Which one do you think is the "truest white"? Have you experimented with White Balance? Do you have a favorite photo you'd like to share? Put your answers and the link in the comments below!

Join us next Thursday for Week Four: Flash.

9.15.2011

2:12 ISO and Shutter Speed

Hello everyone and welcome to Week Two of the 12 week photo course, which focuses on ISO and Shutter Speed.  Hopefully you have joined in this week. If not, it's not too late. You can find the assignment for  Week Two HERE. Also, if you want to catch up, the pdf for Week One is here and you can still link up for the assignment over at Twenty-Six To Life. <---- click there to get to the week one link up!  Click HERE to go to her site for this week's link up!

This week the question was: When should I use a faster shutter speed?

I often shoot in Shutter Priority (the little S) Mode, since it allows me to manipulate the light by changing the shutter speed and ISO. However, I always need extra tips and it was nice to go through step by step instead of just playing around with it when I am trying to take important photos! 

Our assignment was to put an object (I used a glass) in the sink under running water and try changing your shutter speed (and consequently your ISO) in order to see what happens. Here is what I ended up with. Excuse the quality, or lack of it.

For the first photo, I used a slow shutter, which gives the water a silky effect. However, the light was hard to control. If I upped the ISO, it was too bright, but as you can see, this one is not really light enough.


The second. Better light, not so silky water. You can start to see the bubbles, which means the higher shutter speed is stopping the motion a little.


Here we have a faster shutter speed, which means you have to put the ISO up even more or else you don't get enough light in that little bit of time. Notice the bubbles are more pronounced.


In this last one, you can see the individual water drops. However, the shutter speed is so fast, barely any light is getting in, so I had to bump the ISO WAY up, which causes the photo to be grainy.


After we were done playing in the sink, the assignment was to use your manual setting and your light meter to find a good light balance, becuase as you can see from the (bad) photos above, the light is the most important element. 

Below, once again, is Papa P. He will probably be a regular feature. He holds nice and still. (click over to Kate's site and see who HER regular feature is!)


After doing the assignment, I experimented indoors and out to find a good balance of light. 

Inside: Slow shutter, high ISO


Outside: Fast shutter / low ISO


So, what I have decided is that I need more practice, especially with moving objects, as the shutter speed will change a lot when the movement changes a lot.

Have you experimented with different shutter speeds? 
Have you used the manual setting on your camera?

Join us next week for Week Three: The Color of Light

9.08.2011

1:12 Aperture

I think I mentioned before that Kate suggested linking up for a 12 week fun photo course online. And it's FREE. Since I am a gourmet hoarder of the first kind, I jumped on this. Free classes? An excuse to play with my camera? I am in! We will be linking up every Thursday with what we have learned for the previous week. This week's post will be about Week One: Aperture.

Instead of my repeating what she has already said, you can hop over to Kate's post where she has links to PDFs for all 12 weeks of the course. Or you can look at WEEK ONE here. Whether you are a beginner or an expert, it always helps to have focus (no pun intended). I, for example, already know a little about aperture. However, it never hurts to get in some extra practice AND having an assignment makes me more likely to get out and experiment!

So here’s the question that week one wants us to answer:
Just how much of your photo do you want to be in focus?

I started by playing around a little.
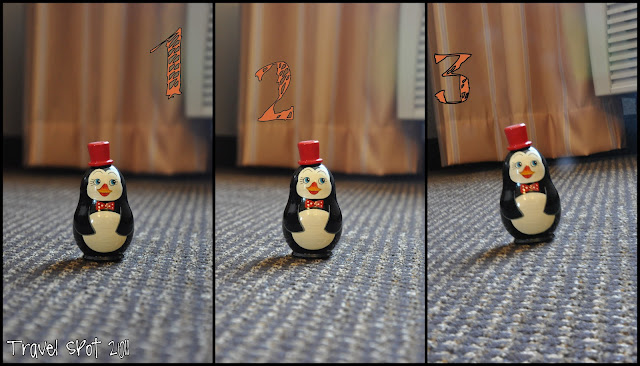
This is Papa P. He has been featured here in the past. 

Notice in photo ONE, the background is blurred. This is becuase I was using a wide open aperture, or a low f/stop.  In TWO, I used a higher f/stop. You can see the background is still blurred, but you have more of the photo in focus than in number one. In THREE, I used a very high f/stop (small aperture). This makes even more of the photo become in focus. Note not only the curtains, but the carpet. In one, its blurred; in two, only the edges are blurred; in three, none is blurred.

I am not going to go into all the camera mumbo jumbo (unless you want me to, you can email me or check out week one's PDF) but basically the lower the f/stop, the less of the photo will be in focus. The higher the f/stop, the more of the photo will be in focus. In a nutshell.


Here again, we have a low f/stop in the first frame (blurred background), going higher as we move to the right (more of the photo is in focus). 


And again, low to high f/stop. 


I take a ton of photos using LOW f/stop. I love macro shots and shots with a blurred background. Many of those photos look like this: 


So my goal for myself was to take some photos using a smaller aperture (a larger f/stop). 
So here are some of the results.


It was fun but I still need more practice! 

Lessons learned?

First, I had to re-remember that the bigger the aperture, the more light that gets into the lens. So, when you are shooting with your aperture wide open, you don't need your ISO to be as high or your shutter speed to be as low. The opposite goes for the small aperture. I had to bump up my ISO and lower my shutter speed for some of them. (they call this the "exposure triangle")

Also, I still need to practice more, as I tend to "set it and forget it" like Ron Popeil. I need to be conscious of what my settings are set on and remember to change them! Ansel Adams is well known for his landscape shots, which he used a very a very small aperture for. I strive to be more like him! (He used f/64!!)

Join us for next week's link up where we will be talking about: ISO and Shutter Speed.

Have you experimented with aperture? What f/stop do you like best? If not, just as an observer, which photos are more pleasing to your eye? Blurred or not blurred background?